💻 Local Machine Setup
For this course, you will need a Mac or Ubuntu (GNU/Linux) machine.
If you are using Windows, you can run Ubuntu inside Windows thanks to WSL.
You can install WSL by running the following command in a Windows PowerShell terminal:
wsl --install -d Ubuntu-24.04
Package Manager
First, let's get a package manager to help install the software that will be needed.
- macOS
- Ubuntu
macOS doesn't come with a package manager by default, so we will install Homebrew.
Open a terminal and run the following command:
/bin/bash -c "$(curl -fsSL https://raw.githubusercontent.com/Homebrew/install/HEAD/install.sh)"
Once Homebrew is installed, you can install software by running:
brew install <package-name>
Ubuntu comes with a package manager called apt. To install software, run the following command in a terminal:
sudo apt install <package-name>
Shell
A shell is a program that takes commands from the keyboard and gives them to the operating system to perform. In the old days, it was the only user interface available on a Unix-like system such as Linux. Nowadays, we have graphical user interfaces (GUIs) in addition to command line interfaces (CLIs) such as the shell.
To open a shell, you can use the following keyboard shortcut:
- Mac:
Cmd + Spaceand typeTerminal - Linux:
Ctrl + Alt + T
BASH
bash is a Unix shell and command language written by Brian Fox for the GNU
Project as a free software replacement for the Bourne shell. First released in
1989, it has been used widely as the default login shell for most Linux
distributions and Apple's macOS Mojave and earlier versions.
We will not go into the details of bash here, but you can find more
information on the Wikipedia page.
While we will not be using bash as our default shell, it is still a good idea
to know how to use it.
Furthermore, many of the commands we will be using in this course are written
for bash.
ZSH
zsh is a Unix shell that can be used as an interactive login shell and as a
command interpreter for shell scripting. Zsh is an extended Bourne shell with a
large number of improvements, including some features of Bash, ksh, and tcsh.
We will be using zsh as our default shell in this course.
Install
- macOS
- Ubuntu
brew install zsh
sudo apt install zsh
Set as default shell
Set zsh as default shell:
chsh -s $(which zsh)
Oh-My-Zsh
Oh-My-Zsh is an open source, community-driven framework for managing your zsh configuration (and it comes with a bunch of plugins and themes).
Install
sh -c "$(curl -fsSL https://raw.githubusercontent.com/ohmyzsh/ohmyzsh/master/tools/install.sh)"
.zshrc
The .zshrc file is a script that is executed each time a new zsh shell is
started. It is located in your home directory (~/.zshrc).
You can edit the .zshrc file with your favorite text editor.
We will be adding some configuration to the .zshrc file in the next sections.
Git
Git is a free and open source distributed version control system designed to handle everything from small to very large projects with speed and efficiency.
A version control system (VCS) allows you to track the history of a collection of files. It supports creating different versions of this collection. Each version captures a snapshot of the files at a certain point in time and the VCS allows you to switch between these versions.
Check out the Git documentation for more information.
To check if you have Git installed, open a shell and run the following command:
git --version
If you don't have Git installed, you can install it with your package manager
Visual Studio Code
Visual Studio Code is a free source-code editor made by Microsoft for Windows, Linux and macOS. Features include support for debugging, syntax highlighting, intelligent code completion, snippets, code refactoring, and embedded Git.
We will be using Visual Studio Code as our code editor.
To install it, run:
- macOS
- Ubuntu
- Windows
brew install --cask visual-studio-code
sudo apt install code
Donwnload Visual Studio Code using the following link Visual Studio Code
It is a good idea to install the following extensions for Visual Studio Code. These extensions will make your life easier when working on the assignments.
Extensions
Open Visual Studio Code and click on the Extensions icon in the sidebar.
Live Share
This extension allows you to share your code with others and collaborate in real time.
Remote Dev
This extension allows you to develop inside a container, on a remote machine, or in the Windows Subsystem for Linux (WSL).
Python
This extension adds support for Python to Visual Studio Code.
Jupyter
This extension adds support for Jupyter notebooks to Visual Studio Code.
Python
Python is an interpreted, high-level and general-purpose programming language. Python's design philosophy emphasizes code readability with its notable use of significant indentation. Python is a popular programming language that is used for many different things: from web development to data science.
We will be using it as the main programming language.
Python 3 is the latest version of Python. It should be installed by default on macOS and Ubuntu.
To check if you have Python 3 installed, run:
python3 --version
Virtual Environments, Virtualenvwrapper, and Pip
Virtual environments are a way to create isolated Python environments for different Python projects. In this course, we will be using virtualenvwrapper to manage our virtual environments.
Pip is a package manager for Python packages, or modules if you like.
So let's install pip and virtualenvwrapper using the OS package manager.
- macOS
- Ubuntu
brew install pip  # this will install pip
pip install --user virtualenv virtualenvwrapper
sudo apt install python3-pip
sudo apt install python3-virtualenv python3-virtualenvwrapper
Note that we are using apt to install pip and virtualenvwrapper on Ubuntu.
That is because Ubuntu manages its own Python packages and we don't want to interfere with that.
We can update pip and virtualenvwrapper using pip after installing them with apt.
pip3 install --user --upgrade pip virtualenv virtualenvwrapper
.zshrc
We will be adding some configuration to the .zshrc file.
Open the .zshrc file using your preferred text editor.
code ~/.zshrc
If the code command is not recognized in your terminal, you can enable it by opening Visual Studio Code, pressing Cmd + Shift + P (on macOS) or Ctrl + Shift + P (on Windows/Linux), typing Shell Command: Install 'code' command in PATH, and pressing Enter.
Once the .zshrc file is open, add the following lines at the end:
- macOS
- Ubuntu
# Python
export WORKON_HOME=$HOME/.virtualenvs
export VIRTUALENVWRAPPER_PYTHON=/usr/bin/python3
export PATH=$PATH:$HOME/.local/bin
source virtualenvwrapper.sh
# Python
export WORKON_HOME=$HOME/.virtualenvs
export VIRTUALENVWRAPPER_PYTHON=/usr/bin/python3
export PATH=$PATH:$HOME/.local/bin
source /usr/share/virtualenvwrapper/virtualenvwrapper.sh
Assigning a Static IP for your Local Machine to connect to the Raspberry Pi
If you are using Windows and WSL, then for this section only, follow the Windows tab rather than the Ubuntu tab.
- macOS
- Ubuntu
- Windows
Open System Settings > Network.
Select the network interface for the Raspberry Pi (likely called RNDIS/Ethernet Gadget).
If you are unsure which interface this is, disconnect the RPi from your laptop. This will remove the interface from the list. Reconnect the RPi to your laptop and the interface should appear again.
With the correct interface selected, click Details....
Under the TCP/IP tab, set the Configure IPv4 dropdown to Manually.
Enter the following
IPv4 Address:192.168.3.1Subnet Mask:255.255.255.0
Click OK to save the settings.
Open Settings -> Network.
Select the interface connected to your Raspberry Pi.
If you are unsure which interface this is, disconnect the RPi from your laptop. This will remove the interface from the list. Reconnect the RPi to your laptop and the interface should appear again.
Click the settings gear icon next to the itnerface.
Go to the IPv4 tab and set the IPv4 Method to Manual.
Click Add and enter:
IPv4 Address:192.168.3.1Subnet Mask:255.255.255.0
Click Apply and reconnect the interface if needed.
Open Network Connections. Find the network interface for the Raspberry Pi.
This interface should appear as USB Ethernet/RNDIS Gadget.
If you are unsure which interface this is, disconnect the RPi from your laptop. This will remove the interface from the list. Reconnect the RPi to your laptop and the interface should appear again.
Right click on the interface and choose Properties.
Select Internal Protocol Version 4 (TCP/IPv4) and click Properties.
Choose Use the following IP address and enter the following:
IPv4 Address:192.168.3.1Subnet Mask:255.255.255.0
Click OK, then close to apply the settings.
QGroundControl Installation and Setup
QGroundControl (QGC) is ground control station software that serves as the graphical user interface to view the camera and control the ROV.
Install Links
Download the latest recommended version from the link below based on your operating system and install it on your computer.
- macOS
- Ubuntu
- Windows
Network Setup
When you are done with the installation process, follow the following steps below based on your operating system:
- macOS
- Ubuntu
- Windows
- Go to System Preferences > Network
- Select USB 10/100 LAN
- Set Configure IPv4 to Manually
- Set:
- IP Address:
192.168.2.1 - Subnet Mask:
255.255.255.0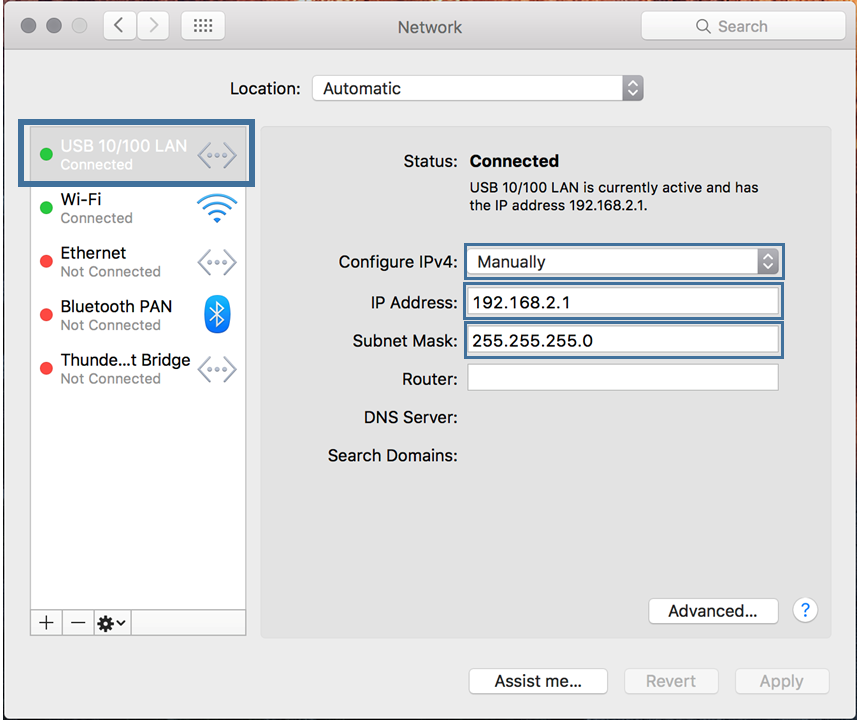
- IP Address:
-
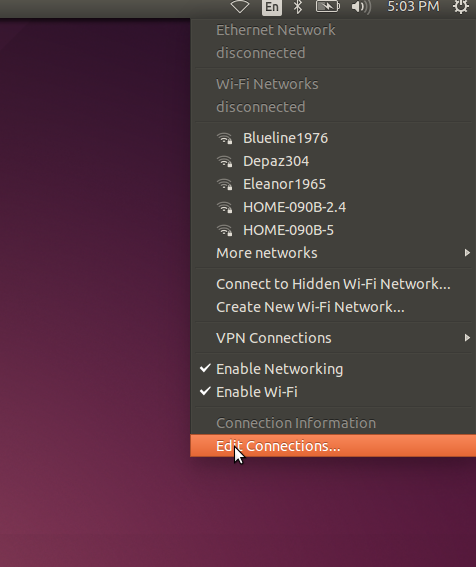
Click the Network icon > Edit Connections...
-
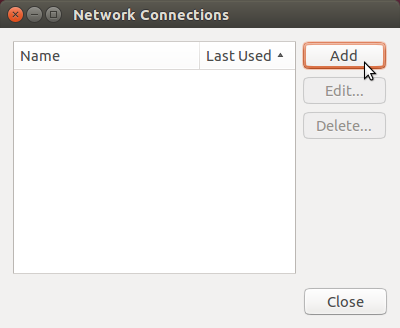
Click Add
-
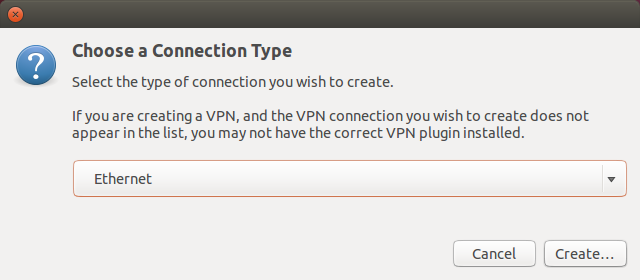
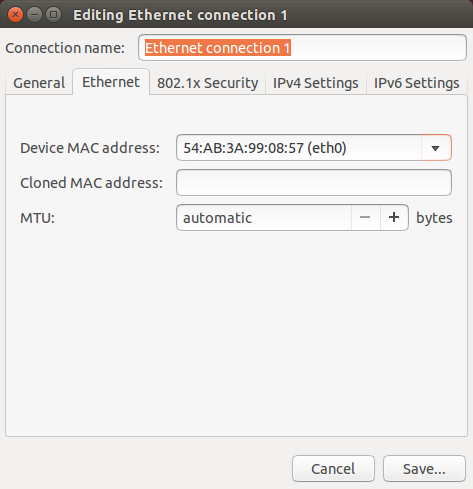
Select Ethernet and click Create...
-
Choose your Ethernet adapter from Device MAC Address
-
Go to IPv4 Settings, set method to Manual, and enter:
- Address:
192.168.2.1 - Netmask:
255.255.255.0 - Gateway:
0.0.0.0Click Save...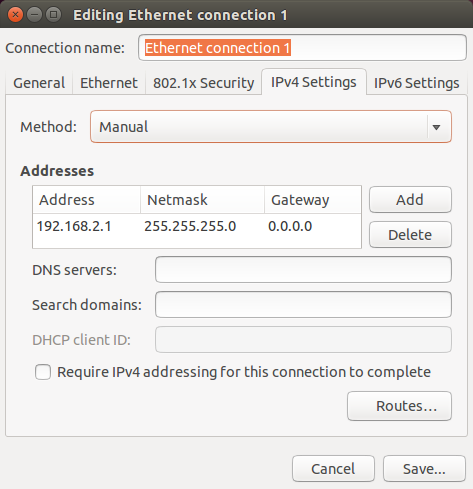
- Address:
-
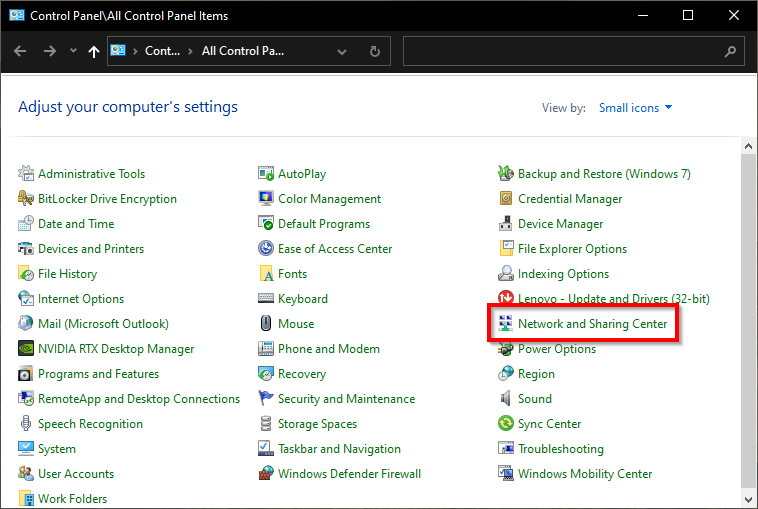
Go to the Windows Control Panel > Network and Sharing Center. If not visible, set View by to large or small icons.
-
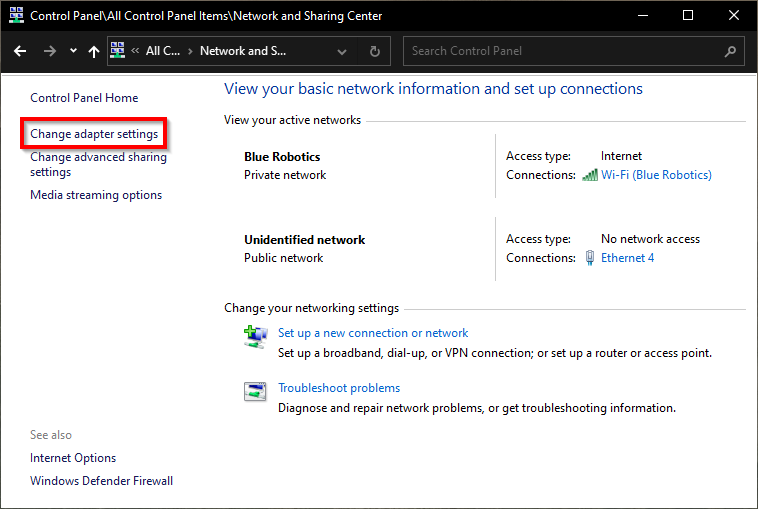
Select Change adapter settings.
-
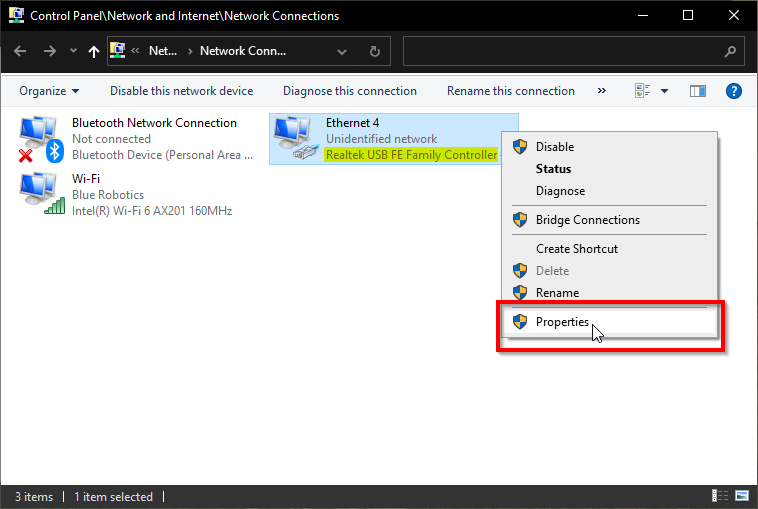
Find the Realtek USB FE Family Controller, right-click and choose Properties.
-
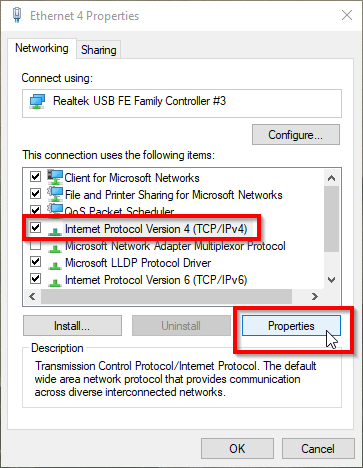
Select Internet Protocol Version 4 (TCP/IPv4) and click Properties.
-
Use the following settings:
- IP Address:
192.168.2.1 - Subnet Mask:
255.255.255.0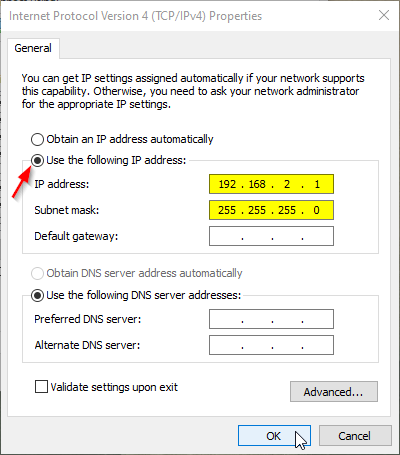
- IP Address:
Firewall Settings
Make sure that you have already installed and launched QGroundControl before trying to do the next steps
-
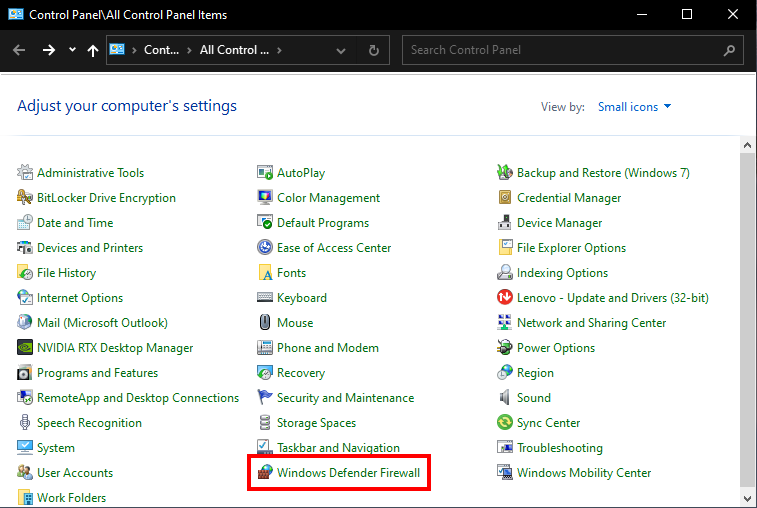
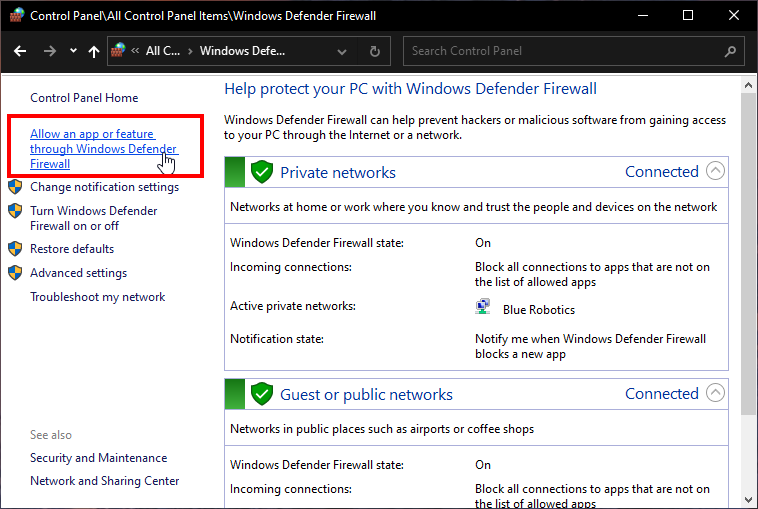
Go to Control Panel > Windows Defender Firewall.
-
Click Allow an app or feature through Windows Defender Firewall.
-
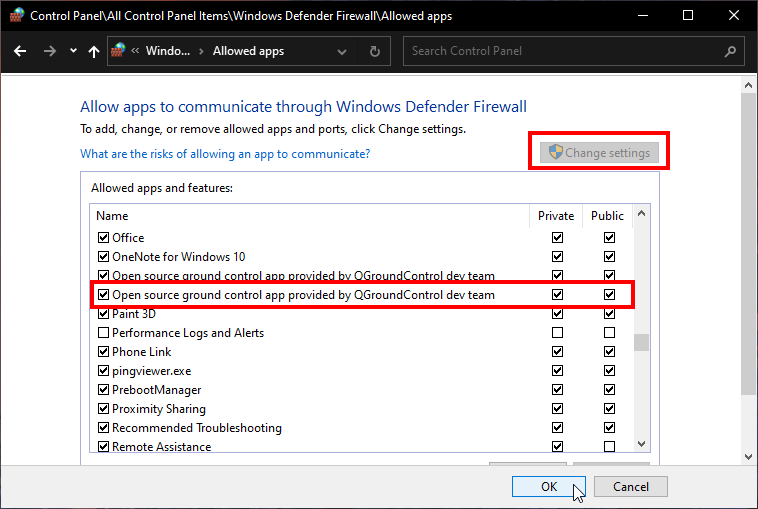
Click Change Settings, find QGroundControl and allow it for Private and Public.
Connecting the BlueROV2 to QGroundControl
- When the BlueROV2 is connected to your Linkbox and powered on, start the QGroundControl application.
- Wait a few seconds for the ROV to auto-connect and for the green parameters bar to finish loading from left to right.
If this is the first time setting up the ROV, you will receive a message that additional setup is required.