2.1 Introduction
Robot Operating System 2 (ROS 2) is a middleware with open-source libraries and tools to build and support robotics applications. The documentation can be found here.
Terminology
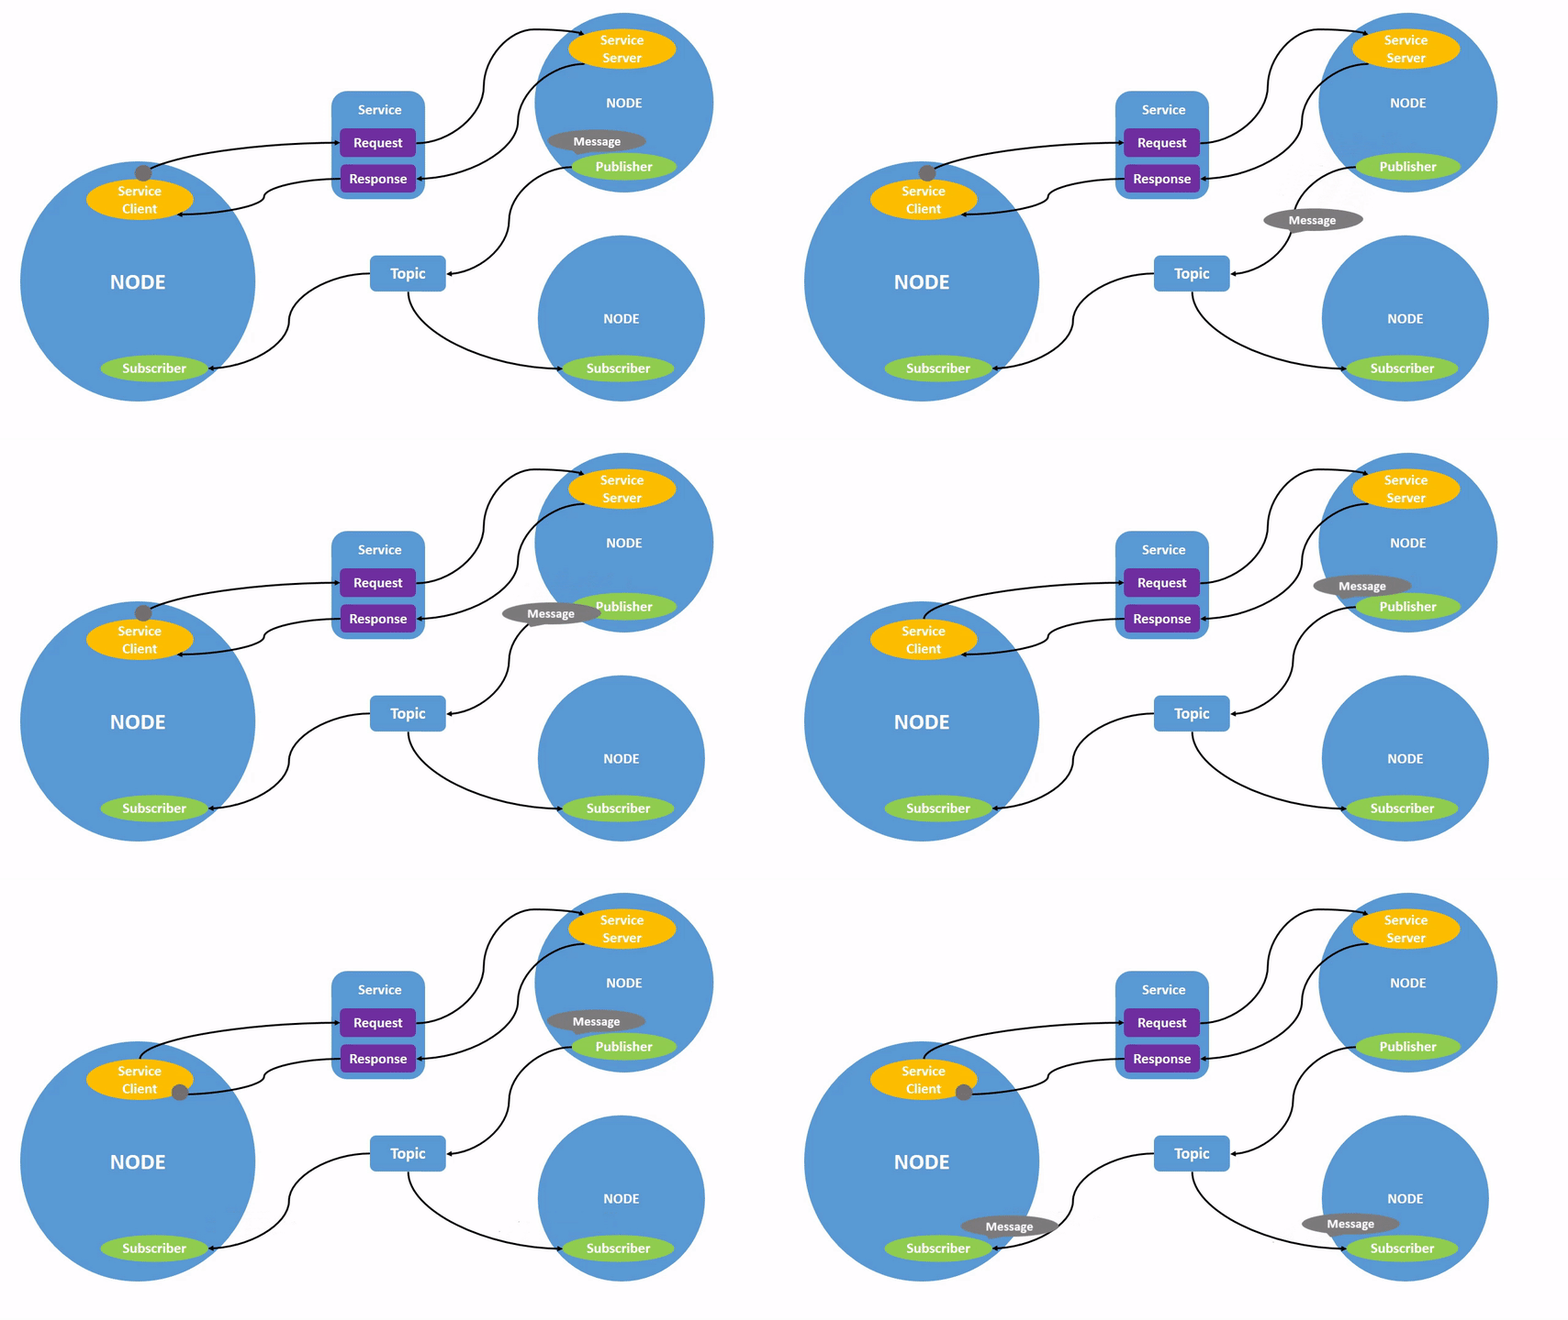
The ROS 2 Graph describes the general terminology and structure of ROS 2 at the user-level. The ROS 2 graph consists of:
- Nodes
- Topics
- Messages
- Services
- Parameters

Nodes
Nodes are instances of executables that act as individual computation entitites. They perform specific tasks, such as processing sensor data or controlling hardware. Nodes communicate with each other using publishers/subscribers, services, and actions.
Multiple nodes can publish to and subscribe to the same topics.

Topics
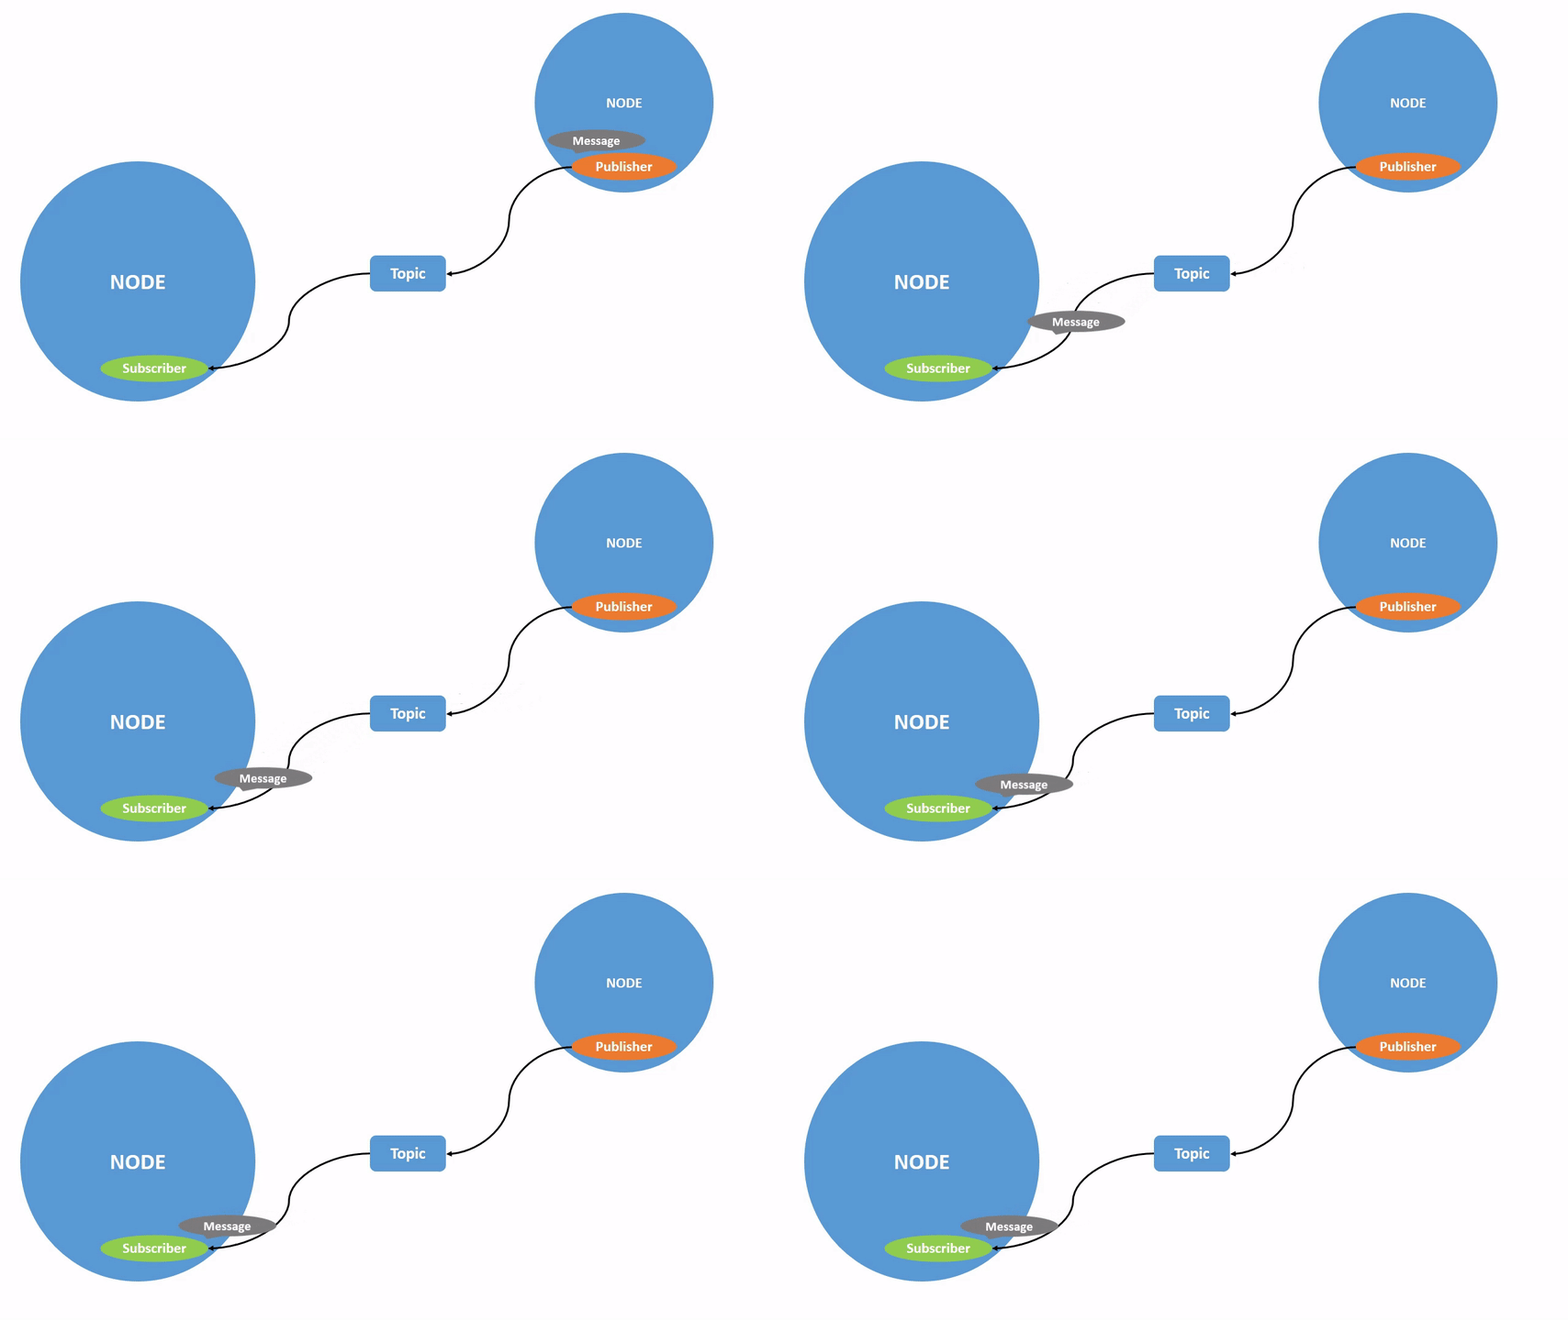
Topics are named buses that nodes use to exchange messages in publisher/subscriber pairs. Nodes talk to other nodes by publishing messages to topics. Nodes listen to other nodes by subscribing to those topics to receive the messages.
Each topic is limited to a single message type specified at the time when the topic is named. Multiple topics can have the same message type.
Messages
Messages are data structures used to communicate information between nodes via topics. These structures contain combinations of fields and data types, and are defined in .msg files. The field is the name of specific data in the structure, while the data type is typically either a primitive data type or another message type. Messages define specific information such as sensor data or control input.
In the below example message file Vector3.msg, there are three data fields x, y, and z, each with a data type of float64.
Vector3.msg

float64 x
float64 y
float64 z
The data type can be any primitive data type, other message types, or arrays.
Services
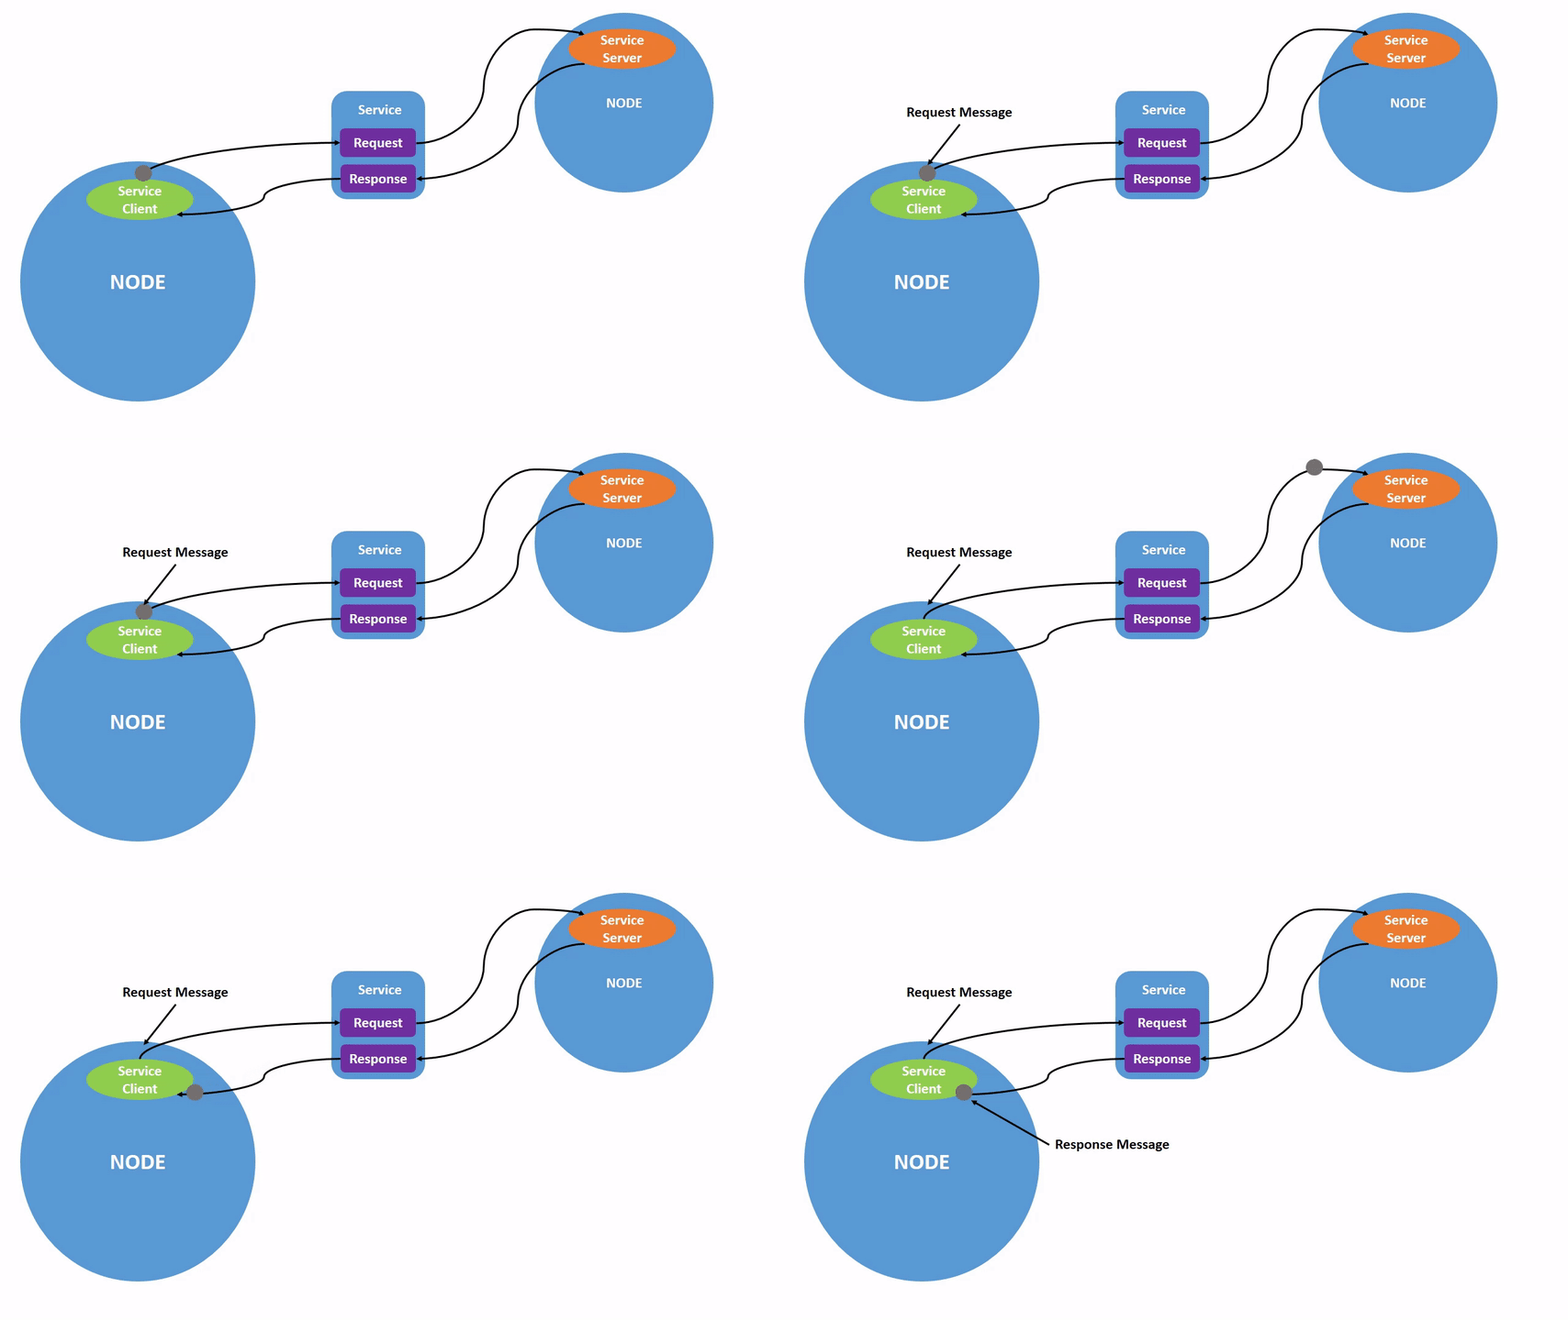
Services are used by nodes to co communication method with a request-response mechanism. A client sends requests to a server and receives responses after the service is complete.

Parameters
Parmaeters are modifiable values assigned to individual or multiple nodes at runtime.
Environment Setup
Source ROS 2 in .zshrc File
For ROS 2 to be accessible in the terminal, the ROS 2 installation and all workspaces must be sourced. The installation contains all default packages and tools necessary to use ROS 2. Workspaces are locations that contain user-defined packages/code.
- Configure the
.zshrcfile to source the ROS 2 installation. Using your favorite text editor, add the following line to the bottom of.zshrcfile on thebackseat.
source /opt/ros/jazzy/setup.zsh
- Source the
.zshrcfile again to apply the changes in the current terminal.
source ~/.zshrc
Create a ROS 2 Workspace
Workspaces are directories where you store and build your user-written ROS 2 code.
- To create a workspace, start by making an empty directory named
auvc_ws.
cd && mkdir auvc_ws
Every workspace contains the following four directories:
build: files for compiling packagesinstall: compiled packages and executableslog: compile historysrc: user-defined packages/code
- Initialize the
build,install, andlogdirectories by compiling the empty workspace. Thesrcdirectory is manually created in the next step.
When you run colcon build to compile packages in a workspace you MUST run the command in the workspace directory.
BEFORE running the command, run pwd to print the working directory and ensure that the path ends with auvc_ws.
colcon build
- Configure the
.zshrcfile to source the installation and source the workspace. Using your favorite text editor, add the following line:
source ~/auvc_ws/install/setup.zsh
- Lastly, create the
srcdirectory.
mkdir src
Create a ROS 2 Package
Packages are structured directories where users write their nodes.
- Create a new package in your ROS 2 workspace.
When you create a package with ros pkg create, you MUST run the command inside the src directory within the workspace.
BEFORE running the command, run pwd to print the working directory and ensure the path ends with auvc_ws/src.
ros2 pkg create tutorial --build-type ament_python
In this case, tutorial is the name of the package and --build-type ament_python specifies the package is a python package.
- Open the package in Visual Studio Code and inspect the structure.
code ~/auvc_ws/src/tutorial
Within the tutorial package, you will find a second, empty directory that is also named tutorial. Each ROS 2 python package contains a subdirectory with the same name as the package. Python files (your ROS 2 nodes) go inside this subdirectory.
For this example package, you will create any python files inside the tutorial subdirectory.
You can check whether you are in the right place by using pwd to print the working directory and verifying that the path ends in auvc_ws/src/tutorial/tutorial.
Alternatively, if you were working in a package called <your_package_name>, the subdirectory would also be called <your_package_name>.
To ensure your package compiles correctly, there are two files that must be modified inside the package in addition to your python nodes:
package.xml: defines package dependenciessetup.py: define package compilation data
Problem Set
Problem One
Create a node in your tutorial package that publishes Vector3 messages to a topic named /tutorial on a timed interval.
-
Create a new python file in the your
tutorialpackage namedpublisher.py. -
In the file, add the following imports:
import rclpy    # the ROS 2 client library for Python
from rclpy.node import Node    # the ROS 2 Node class
from geometry_msgs.msg import Vector3    # the Vector3 message type definition
-
Create a class for your node that inherits from the ROS 2 Node class.
-
In the initializer method, add:
super().__init__("tutorial_publisher")    # names the node when running

self.pub = self.create_publisher(
    Vector3,        # the message type
    "/tutorial",    # the topic name
    10              # QOS (will be covered later)
)

self.timer = self.create_timer(
    1.0,    # timer period (sec)
    self.publish_vector3    # callback function
)

self.get_logger().info("initialized publisher node")
In this problem, the publish_vector3 method will be called by the timer every 1.0 seconds.
- Create a method
publish_vector3that publishes aVector3message when called. Replace the values with random values.
An empty ROS 2 message is created using a variable of the message type:
msg = Vector3()
The data fields of the message are accessed as follows:
msg.x = 0
msg.y = 0
msg.z = 0
The message is published by the publisher using:
self.pub.publish(msg)
- Add the
mainfunction below the class definition.
def main(args=None):
    rclpy.init(args=args)
    node = <YOUR_CLASS>()

    try:
        rclpy.spin(node)
    except KeyboardInterrupt:
        print("\nKeyboardInterrupt received, shutting down...")
    finally:
        node.destroy_node()
        if rclpy.ok():
            rclpy.shutdown()
Problem Two
Create a node in your tutorial package that subscribes to Vector3 messages on a topic named /tutorial and logs them to the terminal.
-
Create a new python file in the your
tutorialpackage namedsubscriber.py. -
In the file, add the following imports:
import rclpy    # the ROS 2 client library for Python
from rclpy.node import Node    # the ROS 2 Node class
from geometry_msgs.msg import Vector3    # the Vector3 message type definition
-
Create a class for your node that inherits from the ROS 2 Node class.
-
In the initializer method, add:
super().__init__("tutorial_subscriber")    # names the node when running

self.sub = self.create_subscription(
    Vector3,        # the message type
    "/tutorial",    # the topic name,
    self.log_vector3,  # the subscription's callback method
    10              # QOS (will be covered later)
)

self.get_logger().info("initialized subscriber node")
Each time a subscription hears a message on a topic, that subscription calls a callback method.
- Create the subscription method
log_vector3. Calculate the magnitude of the Vector3 and log it in the terminal.
The callback function should be defined as:
def log_vector3(self, msg):
- Add the
mainfunction below the class definition.
def main(args=None):
    rclpy.init(args=args)
    node = <YOUR_CLASS>()

    try:
        rclpy.spin(node)
    except KeyboardInterrupt:
        print("\nKeyboardInterrupt received, shutting down...")
    finally:
        node.destroy_node()
        if rclpy.ok():
            rclpy.shutdown()
Problem Three
Modify package.xml so that the file compiles correctly.
- Below the license tag in
package.xml, add the following dependencies:
<depend>rclpy</depend>
<depend>geometry_msgs</depend>
Only ROS 2 specific dependencies are required. Python libraries like numpy and random do not need to be added.
Problem Four
Modify setup.py so that the file compiles correctly.
- All nodes that should be compiled to executables must be specified in
setup.pyas entry points. Replace the entry_points in yoursetup.pywith the following:
entry_points={
    'console_scripts': [
        'publisher = tutorial.publisher:main',
        'subscriber = tutorial.subscriber:main',
    ],
},
Consider the first line in console_scripts.
'publisher = tutorial.publisher:main',
The first element, publisher, is the name of the executable once compiled. Each executable must have a unique name within the package.
The second element, tutorial.publisher:main defines the path to the python file and the function to compile. In this case, tutorial is the subdirectory within the package where the nodes are located, publisher is the name of the python file, and main is the name of the function to compile.
Problem Five
Compile and test your nodes.
- Compile the package.
Make sure you are compiling in the correct location. Running the colcon build command in the wrong location will mess up your workspace.
colcon build --packages-select tutorial
The --packages-select flag allows you to select specific packages to compile.
- Open a new terminal on the
backseatand start an instance of the publisher node:
ros2 run tutorial publisher
- Open another new terminal on the
backseatand start an instance of the subscriber node:
ros2 run tutorial subscriber
Review with a TA or instructor to check-off this problem set.